Tardis Console Controls
This page is a reference for the function, location and operation of the Tardis console controls.
|
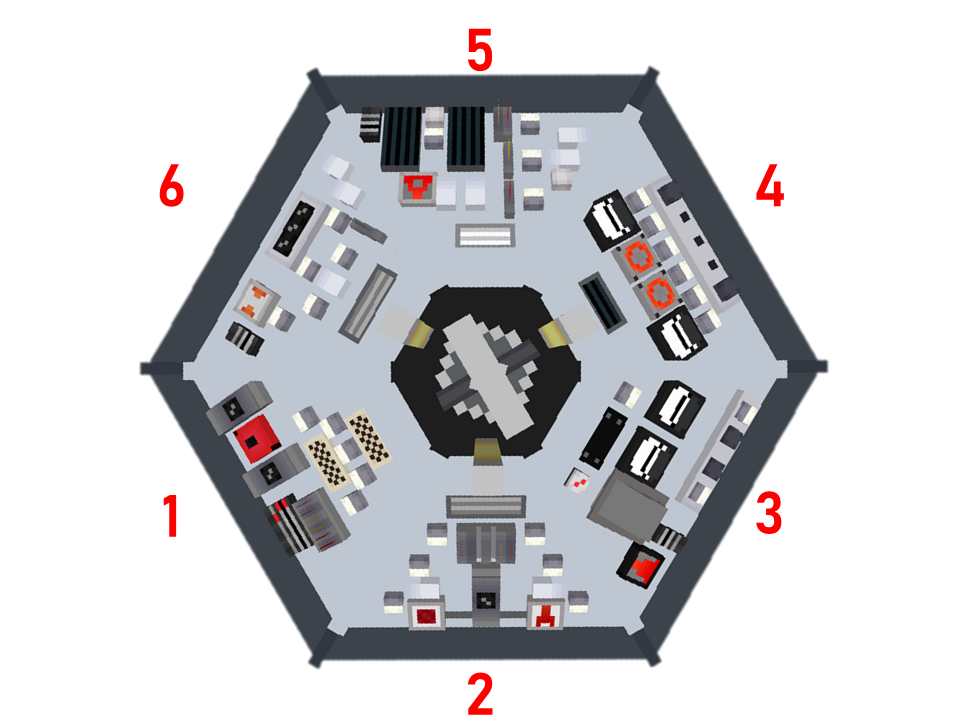
Figure 1 - Top View of the Hell Bent Tardis Console, with numbers indicating the order of panels. (Name and order of panels subject to change by mod authors) |
Notes about diagrams shown:
- The console shown is the "Hell Bent" console (as seen in the Doctor Who Episode "Hell Bent"). This console is the default console in the mod.
- The control being described in each section are highlighted in its corresponding diagram with coloured boxes
Alternative Layouts
To see the layout of the Tardis controls on other Tardis consoles such as the Human Nature Console, please see "Alternative Layouts" in the Table of Contents.
The Hartnell console (light green) has the exact same layout as the Hell Bent console (Figure 1), therefore it is not featured as a seperate layout.
Panel 1
The Communicator
|
Figure 2 - The Communicator |

About:
This feature allows you to detect nearby Dalek invasions of a village. The communicator will automatically play a ringing sound when it detects a Dalek Invasion and will continue to ring until the player interacts with the communicator. (See Figure 2 for location on panel)
Usage:
- Right click the button to show the coordinates of the invasion (and shut it up) This will set your destination coordinates to those of the invasion.
- [Optional] If one wishes to travel to the location of the invasion, pull the Time Rotor Handbrake.
Notes:
- As of 0.0.7A, the communicator can be disabled by removing the antenna from the console. This can be done by right clicking the Tardis Monitor, Sub-systems, then right clicking the communicator button.
- This will place the antenna in the player's inventory.
- The antenna can be replaced by right clicking with it on the Tardis Console
Time Rotor Handbrake
|
Figure 3 - Time Rotor Handbrake |

About:
This lever allows the Tardis to dematerialize (take off).
It can also perform an emergency landing if right clicked when the Tardis is in flight. (Not recommended, causes major damage to sub-systems)
Usage:
- When right clicked the TARDIS will begin take off and land after a certain amount of time. An estimated time to landing will be displayed on the Tardis monitor
Notes:
- The Tardis will automatically land, there is no need to pull the lever again
- If the Tardis doors are not closed prior to the throttle being pulled, the player will be left behind at the Tardis’ current location (where it took off). However, the Tardis will continue to fly to your set destination. The only way to recall your Tardis is to recall it with a Stattenheim Remote
Dimensional Control
|
Figure 4 - Dimensional Control |

About:
This control allows you to select the destination’s dimension. (E.g. The End).
This cycles though all the dimensions in a server, and dimensions from other mods (however this requires a config option to be adjusted, see Notes)
Usage:
- Right click the button to cycle through all available dimensions. (See Figure 4)
- When you are satisfied with your flight settings, pull the Space-Time Throttle to take off.
Notes:
- To allow the use of other mod’s dimensions, set the config option “B:USE_WHITELIST” to false. It is set “TRUE” by default.
Panel 2
Fast Return Switch
|
|

About
This allows the user to return to their immediate previous location.
Usage:
- Right click the button (See Figure 5), then pull the Space-Time Throttle lever. (For location of Space-Time Throttle see Figure 3)
Landing Type Selector
|
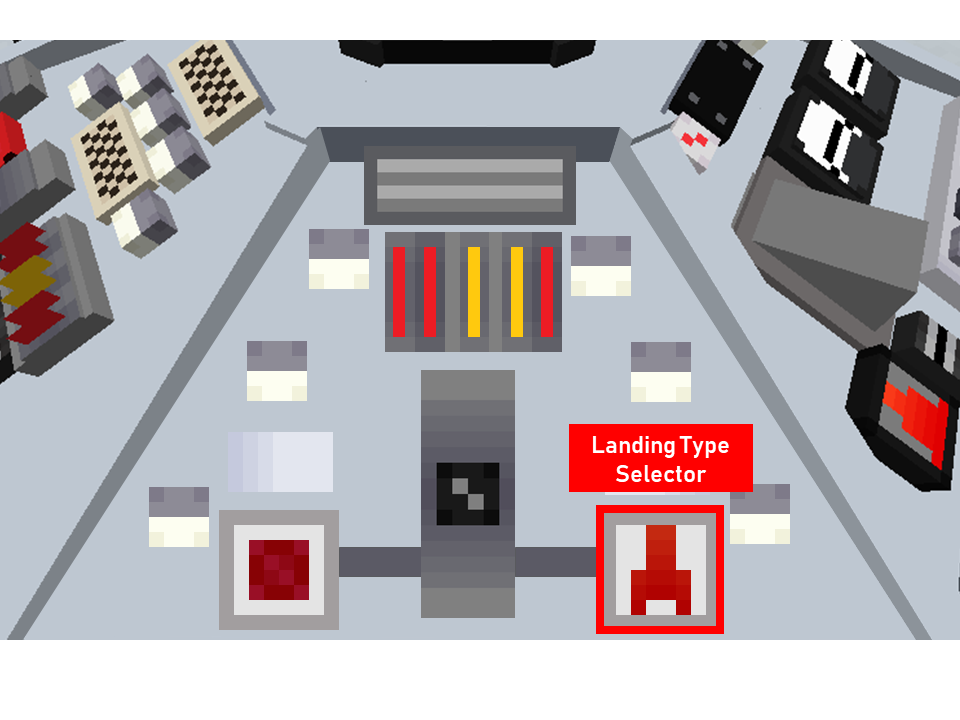
Figure 7 - Landing Type Selector |
About:
This is useful if you are unsure of the potential risks at the destination coordinates. E.g. Large falls, lava pits etc.
Usage:
- Right click the button to toggle between the two type of searching patterns. This toggles whether it'll look up or down first. (See Figure 7)
- When you are satisfied with your flight settings, pull the Space-Time Throttle to take off.
Panel 3
Refueller
|
Figure 8 - Refueller (Alias: Refuel Button) |

About:
The amount of fuel used for each trip will vary, therefore it is recommended that you refuel the Tardis after each flight.
Trips that cross many hundreds of blocks in the same dimension or involve travelling to another dimension will take more fuel.
Usage:
- Simply click on the button (See Figure 8). A status message will appear near the hotbar informing you if the Tardis is fueling or not.
Notes:
- The Tardis refuels faster if it is located in a Rift Chunk.
Panel 4
Telepathic Circuits
About:
|
Figure 9 - Telepathic Circuits |

This control allows the user to teleport to any player on the same multiplayer server or travel to any structure
or biome within a 5000 block radius. (E.g. An End City)
The names of the player/structure/biome is case sensitive. At the moment, if the spelling is not correct, the game will kick you!
Usage:
- Right click the control (See Figure 9). This will bring up a text box.
- Enter the name of the player/structure/biome into the textbox. As of 0.0.7A You can press the TAB key to cycle through the vanilla Minecraft structure names.
- The Tardis will automatically travel to the object you’ve specified.
Notes:
- You cannot teleport to players wearing a Biodampener
Cardinal Direction Control
|
Figure 10 - Cardinal Direction Control |

About:
This allows you to control the direction that the Tardis door faces.
Usage:
- Make sure you have set your destination's XYZ coordinates and dimension.
- Right click the button (See Figure 10). This cycles through all the different directions in Minecraft, much like a compass. (North, South, East, West)
- Right click Space-Time Throttle (See Figure 3). When you land, you will be facing the direction you selected.
X, Y, and Z Plotters
|
Figure 11 - X,Y,Z Plotters |

About:
These controls control your position in space by adjusting the X, Y Z coordinates.
The coordinate values can be increased or decreased. The increment rate is controlled by the Magnitude Adjuster.
Usage:
- To increase the increment value, right click the button for the corresponding coordinate value. (See Figure 11)
- To decrease the increment value, Sneak + right click the button.
- The changes to your destination’s location can be viewed Nav-Com Target values on the monitor.
Coordinate Increment Adjustment
|
Figure 12 - Magnitude Adjuster |

About:
- This control adjusts the how much a coordinate plotter increments.
- The default setting increments the coordinates at 10.
- As the coordinate plotters can take a lot of time to use, the increment can be toggled.
Usage:
- Right click the magnitude adjuster to toggle between 1,10 and 100 increment rates. (See Figure 12)
Panel 5
The Randomizer
|
Figure 13 - Randomizer button |

About:
This control randomizes all of your coordinates within 5,000 blocks in your current dimension.
Usage:
- Right click the button (See Figure 13), then pull the Space-Time Throttle. (See Figure 3)
Door switch
|
Figure 14 - Door switch |

About:
This switch can open or close the main Tardis doors directly from the console , which minimizes the risk of you accidentally stepping out.
Usage:
- Right click the button to close or open the main doors. (See Figure 14)
Panel 6
The Waypoint Controls
|
Figure 15 - Waypoint Selector |

About:
This panel allows you to store your Tardis’ current location (called a waypoint) in a button which you can use to revisit the location.
This panel is made up of 3 components:
- Waypoint Selector button: This button will store information about the Tardis’ current position in a “data slot”
- “Data slot”: An alias used to describe individual waypoint slots. There are 15 waypoint data slots in each Tardis console.
- Waypoints Protocol (via Tardis Monitor Interface): An array of protocols that allow the Tardis position data to be saved in a selected waypoint. This is accessed via the Tardis monitor GUI.
Note: For more information on waypoint mechanics, see the following page: link.
|
Figure 16 - Waypoint Protocols in Tardis Monitor GUI |

Usage:
Setting a new waypoint
- Right click the Tardis Monitor
- Select “Waypoints”
- Select “Save a new waypoint”. A blank textbox will display onscreen.
- Create a name for the waypoint
- Press the Enter key to save the waypoint
- Repeat Steps 1-5 to create multiple waypoints
Travelling to a waypoint
- Right click “Waypoint Selector” to cycle through all waypoints until the desired waypoint name is displayed on screen.
- Each waypoint will be displayed in a message above the hotbar, in the format “Waypoint [No.]: [ Name]”
- Right click the Tardis Monitor
- Select “Waypoints”
- Select “Load current waypoint”. The waypoint data is now uploaded to the Tardis’ navigation.
- Right click Time Rotor Handbrake
Deleting a waypoint
- Right click “Waypoint Selector” to cycle through all waypoints until the desired waypoint name is displayed on screen.
- Right click the Tardis Monitor
- Select “Waypoints”
- Select “Delete current waypoint”. The waypoint is now deleted
Renaming waypoints
- Right click “Waypoint Selector” to cycle through all waypoints until the desired waypoint name is displayed on screen.
- Delete the selected waypoint using the previous steps
- Create a new waypoint using previous steps
Console-specific Controls
|
Figure 17 - Sonic Charging Port (Human Nature console only) |

Sonic Charging Slot
About:
This control allows users to recharge their sonic screwdrivers. This control is only present on the Human Nature console as of 0.0.9A.
Usage:
- Right-click the charging slot with a sonic screwdriver to charge it
- Right click the slot with an empty hand to reclaim the screwdriver.
Alternative Layouts
Human Nature Console
|
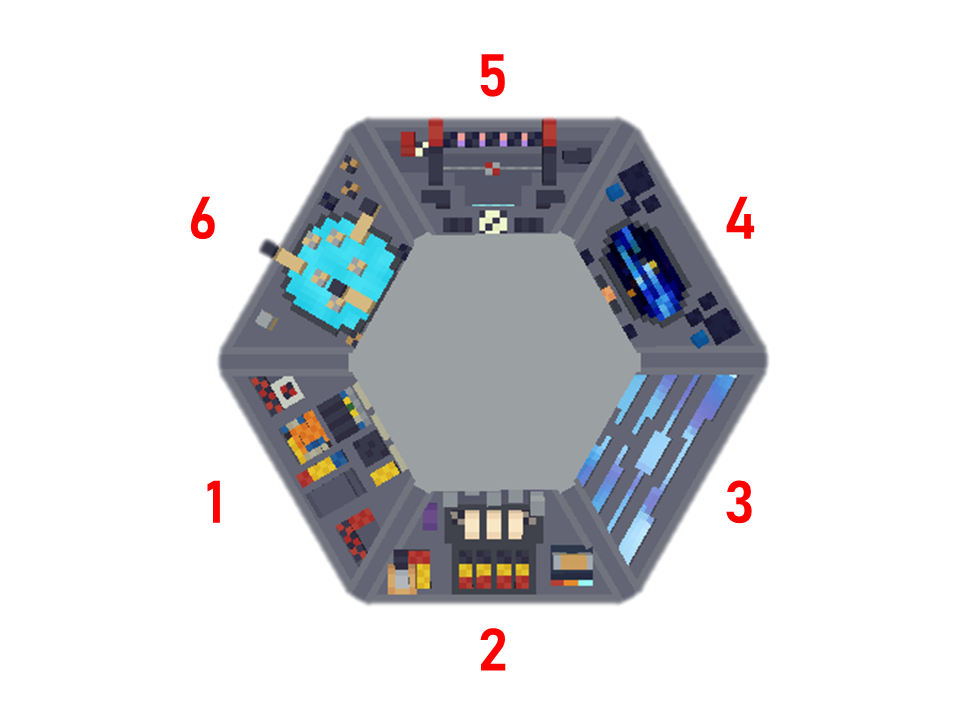
Figure 18 - Overview of the Human Nature console |

The Tardis console seen in the Seventh Doctor story, Human Nature is an alternative console that can be accessed by using the “Change console” button in the Tardis Monitor GUI.
The layout for the controls are as follows.
The operation of the controls are same across all consoles.
Table 1.0 - Controls Layout for Human Nature Console
|
Panel |
Controls on Panel |
Image |
|
1 |
|
|
|
2 |
|
|
|
3 |
|
|
|
4 |
|
|
|
5 |
|
|
|
6 |
N/A |
|


Toyota Console
|
Figure 25 - Overview of the Toyota console |
The Tardis console as seen in Series 7B - Series 10 is an alternative console that can be accessed by using the “Change console” button in the Tardis Monitor GUI.
The layout for the controls are as follows.
The operation of the controls are same across all consoles.
Table 2.0 - Controls Layout for Toyota Console
|
Panel |
Controls on Panel |
Image |
|
1 |
|
|
|
2 |
|
|
|
3 |
|
|
|
4 |
|
|
|
5 |
|
|
|
6 |
|
|


